
Hello, creative souls! Welcome to my creative space in Lindy’s!
I’m pleased to bring you my latest project inspired by the enchanting underwater world. Using Lindy’s Under the Sea 1 & Under the Sea 2 sets, I’ve created stunning coral reef textures and simulated oxidized effects. Join me on this journey beneath the waves and learn how to create these enchanting textures for use in your own projects.

Materials You’ll Need:
- Canvas or another surface
- Lindy’s Under the Sea Sets ( 1 & 2)
- Mat Gel Medium & Gloss Gel Medium
- Crackle Glaze
- Cinnamon powder & Turmeric
- Chipboards with marine designs
- A focal point with marine designs
- Resin gears
- Chunky Embossing Powders
- Black Acrylic paint
- Brushes and palette knives
- Spray bottle with water
- Adhesive and embellishments
Step 1: Preparing the Background
Start by gluing a piece of paper with a marine design (maybe a scrapbook or rice paper). In my project, I used a paper towel I had painted with Lindy’s from another project. Once the paper is in place, protect it with Clear Gesso, dry it, and then apply a coat of Crackle Glaze in two steps. Allow it to dry completely and let it make the crackles.
For my coral reef, I used a special paste called ‘ColaCol Acuático’. If you can’t find this product in your country, you can simulate it with thick layers of white texture paste applied with a spatula. To create the irregularities, use the tip of a brush or a stick to shape the paste. Again allow it to dry completely and then apply a coat of white gesso to prepare the surface for receiving the Lindy’s.

Step 2: Adding Color with Lindy’s Pigments
Lightly sprinkle Lindy’s pigments from the ‘Under the Sea‘ sets onto your textured surface. Spray water over the pigments to activate the colors, allowing them to flow into the gaps and cracks, creating a natural, underwater look. Let it dry completely.
Prepare a mixture of black acrylic paint slightly diluted with water. Carefully apply it to the craters and around the entire edge. Use a spray bottle to help the liquid flow between the cracks and settle into the holes, along with the silver mica from some of the pigments. It really looks amazing.

Step 3: Simulating the Iron Rust Effect
To achieve a realistic iron rust effect on gears and a porthole, I used a mix of products. First, I applied gesso to all the pieces, including both resin and chipboards. Then, I painted them with a mixture of Manta Ray Gray and Gloss Gel Medium to simulate the original iron material.
Next, I applied Yellow Tang Yellow and Clownfish Coral (with a high pigment saturation) mixed with Matt Gel Medium. I focused on applying these colors mainly on the edges and cracks to mimic the natural behavior of rust, but I also generously spread the colors across the surfaces. For added texture and realism, sprinkle cinnamon powder and turmeric onto the wet pigments. This will create a unique rusty effect, enhancing the aged and worn appearance.

Step 4: Simulating Copper Oxidation
In marine environments, copper oxidizes to form a distinctive blue-green patina. To mimic this look, I started with the gears already painted to simulate iron and then painted them with a mixture of Cowabunga Copper and Gloss Gel Medium to replicate the original copper material.
Initially, I aimed to achieve this effect using only the Under the Sea set, but I couldn’t quite get the copper look right. So, I opted for a true copper pigment. Before this paint dried completely, I sprinkled a little cinnamon powder to add irregular texture.
Next, I used a mix of Sea Turtle Teal, Moray Eel Mint, and Matt Gel Medium. I gently blended these colors over textured areas, adding depth and a rusted look to the pieces. However, I wasn’t completely satisfied with the result, so I created a colorless wax paste mixed with these pigments to apply in specific areas.
I admit I haven’t yet achieved the desired effect, so I will continue experimenting and playing with pigments and mediums until I get it right.

Step 5: Adding Color and Texture to Chipboard Elements
In this step, I focused on applying color and texture to other chipboard elements such as seaweeds, corals, a compass rose, and a beautiful seahorse.
Using the same techniques as before, I applied a base coat of gesso to all of the chipboard pieces. For the seaweed, I used a mix of Moray Eel Mint pigment with Gloss Gel Medium and then lightly dusted Carefree Verdigris Chunky Embossing Powder and applied heat.
For the corals and seahorse, I applied a blend of Jellyfish Sting Pink, Parrotfish Purple, and Yellow Tang Yellow. After the paint dried completely, I sprinkled a bit of ‘Of Quartz It Is’ Chunky Embossing Powder to add texture and a touch of glitter.
I used wet watercolor techniques to blend colors and create textures, highlighting intricate patterns and seamlessly integrating elements into the underwater scene.

For my compass rose I first applied a very light layer of white gesso, with the dry brush technique to avoid losing the compass design. I then lightly applied color with Parrotfish Purple diluted with water and protected it with Clearly Clear Embossing Powder.
I also prepared a title with the word Dream because it is part of the story of my little sea mermaid, this beautiful woman that I have cut out of scrapbook paper. I decorated the text with Chalk It Up Chunky Embossing Powder.

Step 6: Composition and finishing Touches
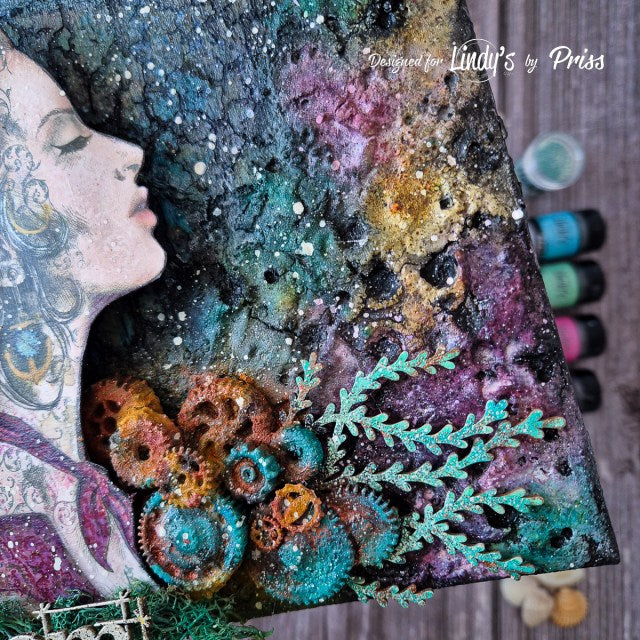
With patience and creativity, we organize our marine elements and gears on the canvas, allowing you to appreciate the textures of the coral reef that we previously built for our background. We play with shapes, colors, and textures to create a harmonious composition that reflects the magic of the ocean and allows us to highlight our focal points, which are the Sea Queen and her inseparable friend ‘Mystic Bubble‘.

It’s important to group and stack your gear pieces when organizing them, as they need to touch each other for the machinery to function properly. Once they’re glued together, blend the oxidation tones between the pieces. Then add shadows with black acrylic paint, and spray a little water to distribute them evenly.
Finally, I like to add a few splatters that help integrate the elements and I confess that it’s the most fun part of the entire process. This time I opted for white because it already had enough darkness in the background and also reminded me of sea foam.
Creating these underwater textures with Lindy’s pigments was such a joy! I hope you feel inspired to dive into your own projects and explore the endless possibilities of mixed media art. Remember, the ocean is full of surprises, so let your creativity flow!
Don’t miss out on our captivating video tutorials that we’ll be dropping on Instagram and Facebook, showing the process in detail. AWESOME!
Lindy’s Products
- Shakers 2.0: Under The Sea #1, Under the Sea #2
- Shimmer Magicals: Cowabunga Copper of Totally 80’s set
- Embossing Powders: Clearly Clear, Chalk It Up, Carefree Verdigris, Of Quartz It Is
Until next time, happy creating time!
Hugs, Priss