
Hello, creative souls! Welcome to my creative space in Lindy’s!
I’ve got something really cool to share with you – I’ve been using Lindy’s Words of Wisdom set to make my own permanent sprays for a new project. Come along on this exciting journey with me and discover how to make awesome decor for your home or to give as a special gift to someone you love.
You’ll Need:
- Canvas or another surface
- White Gesso
- Lindy’s Flat Magicals Words of Wisdom
- Gel Medium
- Textured Paste and Stencils
- Chipboards
- A focal point with wings
- Resin gears and other elements
- Silver Metal gears and other elements
- Chunky and White Embossing Powders
- Black Acrylic paint
- White Matte Wax
- Brushes and palette knives
- Two little Spray bottles with water
- Adhesive and embellishments

The support I picked has two parts: a cool wooden base in the shape of a medallion, and a resin frame that fits perfectly on top.
Step 1: Preparing the Wooden Base
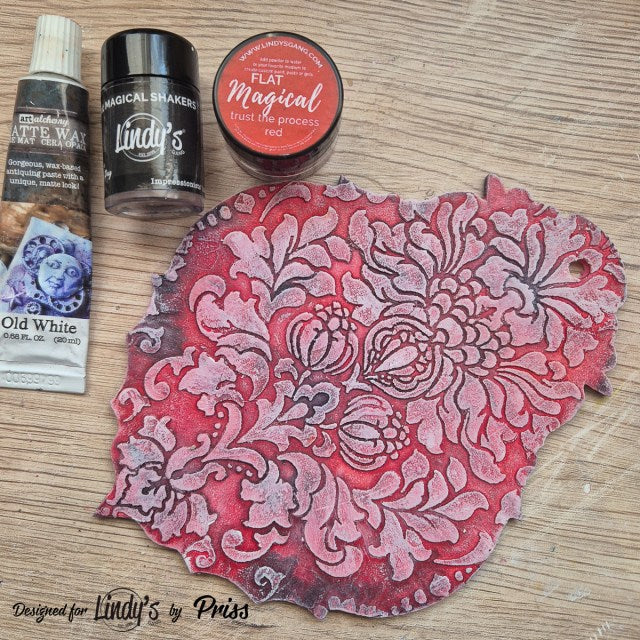
Alright, let’s kick things off by giving our wooden base a good coat of gesso. Think of it as the primer that sets the stage. Once that’s all dry, grab your favorite stencil and spread some white textured paste over it. I used a baroque design that just fits so well with my wooden base.
Next up, I whipped up a custom spray. I filled a mini spray bottle with water and added a pinch of Lindy’s Flat Trust the Process Red until I hit that perfect shade of red. Now, here’s a little trick to make it permanent: add a few drops of liquid gel medium right into the bottle. This medium is a game-changer; it’s what turns pigments into acrylic paints and also helps create glazes with acrylics. So, by mixing it with our amazing Lindy’s, you lock in the color for good. You can choose whether you want it shiny, matte, or satin. I went with satin for that subtle glow.
Before the paint dries, I carefully apply tiny drops of Impressionist Ink activated with water, strategically placing them to produce a variety of shades and enhance visual appeal.


Step 2: Preparing the Resin Frame
It’s the perfect time to pick up where we left off with the resin frame. We’ve already applied a layer of white gesso as a primer. I’ve chosen the light color Commit to it Teal for the frame, inspired by a stunning combination I spotted on Instagram. The two shades complement each other beautifully, and I just had to try it out, especially with the ideal support I have.
To paint it, I’ve got my trusty permanent spray bottle filled with a touch of water, the right amount of pigment, and the satin medium liquid gel.

Step 3: Letting them Dry and Add the Final Touch
Now that we’ve got the background prepped, make sure to let everything dry thoroughly. Patience is key here because we’re about to add that extra bit of magic. We want that stencil design to really pop and show off its beauty, so there are a couple of techniques you can use, or even mix together for more impact.
First up, there’s the classic dry brush technique, a favorite in the crafting world for highlighting details. You’ll need a stiff-bristled brush (a good old stencil brush works wonders) and some white acrylic paint or gesso (I personally lean toward gesso because it gives that extra matte finish). Load up your brush with paint, then dab off the excess on a napkin or paper towel until the brush is almost dry. Now, gently sweep the brush over the surface with light, soft strokes. You’ll notice the paint catches mainly on the raised areas, giving that textured design some extra dimension. Keep at it until you’re happy with the effect, working from the outside in.
The second technique is even easier. All you need is some matte white wax and your finger. Gently rub the wax over the textured areas of your design. Just keep applying until you get the look you want. You can layer it as much or as little as you like, letting those textures stand out effortlessly. This technique is good even if you have not mixed the pigments with gel medium, because it will not activate them too much, and once dry it becomes permanent.
However, if you want to go even further with the textures, you can do like me and apply the dry brush technique first and then highlight even more with the wax. The brush will first create new textures that will stand out more with the wax.

Step 4: Adding Color to the rest Elements
For my composition, I have selected various resin elements. First I applied a layer of white gesso as a primer and then I painted them with the same techniques as the previous steps trying to balance elements and both colors in the composition.
As a focal point, I selected a stunning owl among scrapbook papers and my idea is to place it emerging from within a small frame, as if seeking to free itself from its confinement. This led me to choose the color teal for the small frame and incorporate red elements into the rest of the design, symbolizing freedom with winged elements placed in the composition.

My composition needs a base to sit on because the frame is not stable enough, so I have chosen a couple of extra elements for it. A plastic disk I had lying around and a chipboard with flowers and gears. To create contrast between the base and the elements of the composition, I have decided that these extra support elements are in neutral colors such as black and white.
I painted the circle with black acrylic glitter and then applied a layer of texture paste with a stencil that I would leave white.
For the chipboard, I used Lindy’s Embossing Powders, mostly Wowzers White Detail EP, and a few pinches of Groovy Granite Chunky EP.

Now, let’s talk embellishments. We’re going to need some flowers and metal pieces to bring this composition to life. I went with silver metal accents to add a touch of brightness to the whole setup.
Now, I didn’t have flowers in the exact shades that would harmonize with the rest of the project, but when you’ve got Lindy’s on hand, that’s never an issue. Keep a stash of white paper flowers around, and you can easily customize them to match any project. For these flowers, I decided to go with the contrasting color from the Just Be Kind Cobalt to add some rich, dark intensity. I made sure to highlight certain elements with the striking It Is What It Is Yellow, bringing that perfect pop of brightness where it’s needed most.

Step 5: Bringing It All Together
The final step is assembling your elements to create a powerful composition. Our focal point here is the owl, symbolizing a desperate attempt to break free from the frame that has held it captive. Carefully arrange all your pieces, ensuring everything is securely adhered to. Use hidden cardboard pieces to add stability and dimension to your composition.
Add the sentiment “Freedom” to reinforce the theme, and integrate everything as always with a few splashes of white paint. This helps tie the elements together and gives the piece a cohesive finish.
And that’s it! Now it’s time to showcase some close-up shots of the most intriguing details.


Don’t miss out on our captivating video tutorials that we’ll be dropping on Instagram and Facebook, showing the process in detail. AWESOME!
Lindy’s Products
-
- Flat Magicals: Words of Wisdom set
-
- Embossing Powders: Wowzers White Detail EP, Groovy Granite Chunky EP
Find discounted sets on the website and use my code (ARTFULLAYERS) for an extra 10% off!
Until next time, happy creating time!
Hugs, Priss